

My husband and I have four craft breweries within 10 miles of our home—with a fifth one due to open soon. Inspired by the creative beers we have tasted, we decided to try home brewing. After our first batch of beer I thought there should be something that could be done with the spent grains after steeping, besides composting. Two options I found were fresh-baked bread (something I will do once the temperatures start to cool, like when we make big batches of soup) and dog treats. So after we brewed a batch of IPA yesterday, I took some of those grains and came up with a recipe.
Two things I will note: First, the steeped grains are taken out prior to the hops being added. Hops are toxic to dogs. Second, give these to dogs in moderation and when you are going to be around them for a while. The reason I say this is that one person I spoke to advised me that the high fiber content in these types of (spent grain) biscuits caused their older dog to get the runs. Duly noted (our dog Hubert got two last night…no problems).
Now, getting back to brewing…Once we took the muslin bag of steeped grains out of the pot, it was placed in a bowl to cool. While it cooled, it sat in its own juices, so to speak, which kept the grains moist.
Biscuit Recipe
- 4 c spent grain
- 2 c unbleached flour
- 1 c natural peanut butter
- 2 eggs
- 1 t ground cinnamon
Preheat oven to 350 degrees F.
In a large bowl, combine all of the ingredients—before adding the eggs, whisk them with a fork in a cup or bowl to break up the yolks, then add to mixture. Once ingredients are combined pretty well, I finished mixing the dough with my hands, periodically adding a bit of flour as needed, and created a ball. It will be somewhat sticky, as you can see below.

As you let the dough ball sit for a couple of minutes (it hardens a little and becomes less sticky), line up the cookie sheets, put out the cookie cutters you want to use and flour the surface to roll out the dough. I split the dough ball in half, which made rolling it in batches a bit more manageable. I used bone-shaped cookie cutters as well as rolled balls that were smooshed with a paw print cookie press. Keep adding small amounts of flour to your rolling pin and sprinkled on top of the dough to alleviate any sticking.
Once you have the shapes cut out, carefully peel away the excess dough and use a spatula to pry up the shapes. Place them on the cookie sheets—no shortening, spray or oil is needed; I used metal cookie sheets as well as ceramic ones (shown below) and nothing stuck.
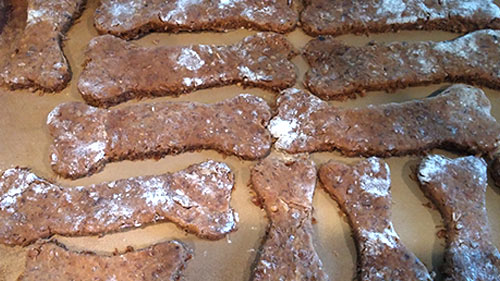
Repeat rolling out dough and cutting shapes. Because of the texture of the grains, the shapes will have rough edges as cookie cutters won’t sever the grains. You can also make your own hand-formed nuggets and shapes. It’s not like your dog will notice if they aren’t perfect, right?
Baking
- Place in 350-degree oven for 30 minutes
- Reduce oven temperature to 225 and bake for 1 hour 45 minutes
- Turn off oven, keep biscuits in oven for at least 15 to 20 more minutes
Remove biscuits from oven and place them onto a cooling rack. They literally slide off of the cookie sheets.

Once completely cooled, place biscuits in air-tight containers or bags. They should be good for about two weeks at room temperature. Or pop the sealed container or bags in the freezer, where they will stay fresh longer. Hubert likes them right from the freezer when it’s hot outside.

This is the look I got when I held up one of these biscuits. There was no way I could snap a photo with one in his mouth…he bolted and inhaled it.
 Send me any recipe variations you might make to this or any photos of your dogs enjoying them! I’d like to see them and I can share on Facebook!


1 Response
[…] summer I created a dog biscuit recipe using spent beer grains after we homebrewed (find it here). We haven’t homebrewed in a few months, but friends of mine over at Tin Cannon Brewing […]